Showing posts with label cookie. Show all posts

Sunday, June 3

Triple Citrus Ricotta Cookies

I discovered something new this weekend. (Aside from a who-knows-how-old dust bunny under my bed.) 


I didn't discover this thing though, really. I was introduced to it. And people have been watching it for ages now.. or since they installed the traffic cameras in Philly. So I "discovered" it, in much the same way Columbus discovered our great nation.

Philadelphia has a television channel... devoted... to... traffic cameras. Rotating camera views of different points on all major highways set to an eclectic mix of music spanning all genres and ages. No repeats (on the music, that is). And it's titled... Jams and Cams.


I know what you're thinking. What happens if you happen to witness a horrible accident? Or just any accident really? Are you supposed to do something about it? I would think so. Thus, there is a lot of responsibility that comes in watching this channel. It's not for the faint of heart.

And now you know what I did this weekend (other than to make these cookies of course). I went to the gym. I ate a delicious meal of bbq brisket out. I drank some beers to kick of Philly Beer Week. And I watched Jams and Cams. I'm so cool.


Soundtrack: I like this.

Triple Citrus Ricotta Cookies
Adapted from Giada DeLaurentis Lemon Ricotta Cookies
Yield: ~3 dozen cookies

2 1/2 c ap flour
1 tsp baking powder
1 tsp salt
1 stick unsalted butter, softened
2 c sugar
2 eggs
1 (15-ounce) container whole milk ricotta cheese
6 tbsp of citrus juices, divided*
~ 1 tbsp zest of the mixed citrus used for juices
1/2 tbsp poppy seeds
1 1/2 c powdered sugar

*I used 2 tbsp orange juice, 2 tbsp lemon juice and 2 tbsp lime juice. Combined them in a bowl and then measured out 3 tbsp of the mix when needed, thus I had 1 tbsp of each in the cookies and in the glaze. You will need 1 lemon, 1 lime and 1/2 an orange for this. Also of note: I used fresh squeezed orange juice, not sure the effect that carton juice would have.

Preheat oven to 375 degrees.

In a medium sized bowl, stir flour, baking powder and salt with a whisk until combined. Set aside.

In a large bowl, cream together the butter and sugar, until light and fluffy. Add the eggs, one at a time, continuously beating the mixture. Once eggs are combined, add ricotta cheese, 3 tbsp of mixed citrus juice, and the zest. Beat just until combined.

Using a spatula, stir in the dry mix and poppy seeds. Dough will be very moist, more similar to a batter.

Spoon ~ 1 tbsp drops of dough onto lined cookie sheets. Dough will spread when baking, so make sure to leave room. (These are a flat cookie, not raised.)

Bake for 15 minutes (or until golden brown at the edges). Remove from the oven and allow to cool on the cookie sheets for ~20 minutes before glazing.

While cookies are cooling, whisk together the remaining 3 tbsp of citrus juice and 1 1/2 c powdered sugar, to create a glaze. Once cookies are cooled, spoon ~1/2 tsp of glaze onto each cookie and spread to coat.

Glaze will need to cool ~2 hrs before storing.


Sunday, April 22

Dark Chocolate & Dried Apricot Oatmeal Cookies

I'm sooo guilty of procrastination right now, it's not even funny. I hope you don't feel too used. I've got this one thing I have to do. And I just can't bring myself to do it.

It's not laundry. Though usually it is.

So instead, let's just think about cookies. What is there to think about? Making them.. eating them... eating them....


Right.

Actually maybe I do have something to say. It's about butter. And how important the temperature of the butter is to making a perfect cookie. It's so important, that my man Alton Brown has dedicated an entire episode of the best show ever (Good Eats) to the cause.

Cue the adorable monster's explanation of the importance of fat in P.1 at 4:17.


To continue watching the tutorial, follow this link. Highly recommended. Shockingly enough, you will find that for "chewy" cookies, the optimal fat is melted butter. Along with some other tweaks of course. Using bread flour allows the recipe to absorb the additional liquid (it contains more proteins than regular flour) and brown sugar for the molasses content will also aid in making a chewy cookie.


For most standard cookie recipes, butter should be just at or just below room temperature. If it's too warm or parts of it are melty, the cookies will spread very thin. If it's too cold, you can't cream it as easily and you could end up with cookies that don't spread at all. 


This is what Betty Crocker has to say on the subject:

"Why use softened butter?

Temperature is everything when working with butter. Cold, hard butter will not work as well for creaming ingredients. Neither will melted butter. When a recipe calls for softened butter, you want butter that is soft, yet slightly firm. Touch it lightly with your finger. It should leave a slight indentation."

It might seem obvious then, that it's important to not allow the butter to melt at all before the cookies enter the oven, but there is one mistake that I've made a few times and I know is pretty common. It's really important to use room temperature cookie sheets. This means don't leave them on top of the oven while it preheats. Don't put them on top of the oven while you spoon out your dough (guilty...). AND if you're going to reuse the sheet for a 2nd round of cookies, you can cool it first by rinsing the back side with cold water, then drying it off.

And this is why baking is so much fun! It's as close to science as I get nowadays. Well, I guess it really is science. The fun part. Not the physics formula memorizing part. Honestly if we had done more of this in high school, I might have dreaded science class a whole lot less. Someone should install ovens in high schools across the country. Bad idea? Maybe. Best idea ever? Definitely.

I hope you are as interested in butter temperature as I am. It's important to cookies, so it should be important to you!

And now, I'll finally get to the point and share a recipe for a delicious oatmeal cookie with decadent dark chocolate and chewy dried apricots. Butter just at room temperature is ideal here. The original recipe says that you could use quick oats, but I think it's important for the best texture to use old fashioned oats. I also used all butter for flavor. If you'd like to know more about why shortening would be used in a recipe this page weighs the pros and cons.


Dark Chocolate & Dried Apricot Oatmeal Cookies
Yield 3 dozen cookies (or a little less if you are as heavy handed as I am)
Adapted from Betty Crocker

2/3 c sugar
2/3 c packed brown sugar
1 c butter, just below room temperature
1 tsp baking soda
1 tsp ground cinnamon
1 tsp vanilla extract
1/2 tsp baking powder
1/2 tsp salt
2 eggs
3 c old-fashioned oats
1 c ap flour
1 c dried apricots, chopped
1/2 dark chocolate chips

Preheat the oven to 350. 

In a stand mixer or large bowl, cream together the butter and sugar until thoroughly combined (start on low speed and increase temperature to medium as things work together). Add baking soda, cinnamon, vanilla, baking powder, salt and eggs. Mix together.

Add oats and flour and mix again, starting on low and gradually increasing. Add apricot pieces and chocolate chips and now mix on low until combined.

Spoon teaspoonful sized scoops onto an ungreased baking sheet, leaving about 2 inches of space between each. Bake for 9-11 minutes, until cookies are browning on the outside, but look slightly just under done in the center. Cool on the cookie sheet for ~3 minutes, then remove to a wire rack.


Sunday, December 4

Mint Chocolate Chip Cookies

Ok, there are 3 huge reasons why I'm really excited about this blog post:


1) I've had too much coffee.


2) These cookies are amazing. Think chewy Thin Mints with gooey dark chocolate bits, covered in a light glaze of powder sugar. Think my brother's worst nightmare (he hates mint and chocolate; we're most likely not actually related).


3) I got an early holiday gift. And allow me to introduce you to my new favorite thing in the whole world: my new camera. After I started this blog, I quickly realized the zoom on my point and shoot just wasn't meant for macro pictures. Or something like that. It's a great camera that I'm definitely going to keep and bring wherever I can't bring this new camera, but it just wasn't meant for what I was using it for. Jeremy was gracious enough to lend me his camera, which did a much better job of capturing the detail and coloring that really makes pictures of food look yummers. It helped me go from this to this. So thanks, you rule! But enough outta me, let me show you what I'm talking about:


Do you see those bits of powdered sugar? 


And, watch this:


crop image


Did you think that was a movie? No, that was a gif file. THAT'S how quickly this thing takes pictures. AGH. I'm so in love.


One note before we get started: This recipe is adapted from one I wrote down a long time ago. I can't for the life of me figure out where it came from; I just know it was a recipe for double chocolate cookies. If this looks familiar to anyone, PLEASE let me know so that I can link to the original website and give credit to the original recipe. Thank you!


Soundtrack: Did I post this already? Maybe, but listen to it again. Because I said so.


Holy Ghost! by DFA Records  


Mint Chocolate Chip Cookies
Yield: 2 dozen cookies


1 1/2 c ap flour
1 1/2 tsp baking powder
1/4 tsp salt
1 c. Andes baking chips (I've seen them at Target, AC Moore, and definitely available online)
6 tbsp butter, softened
1 c sugar
1/2 tsp vanilla
2 eggs
1 c dark chocolate chips (I use these)
1/2 c powdered sugar


In a small bowl, whisk together flour, baking powder and salt. Set aside.


In a microwave safe container, melt the Andes chips, heating in 30 second intervals and stirring in between. Set aside.


In a large bowl, cream butter and sugar together until light and fluffy, about 2-3 minutes. (It won't stick completely together as the sugar ratio is higher here.) Add melted Andes chips and vanilla, beat until combined, using a spatula to scrape down the sides when necessary. Add eggs and continue beating mixture until eggs are fully incorporated. 


Slowly add the dry mixture to the butter mixture, scraping down the sides when needed. Stir in  dark chocolate chips. Gather dough to the center of the bowl, cover and freeze for at least 20 minutes.


At about 10 minutes, preheat oven to 350 degrees.


Remove dough from freezer and shape into 1 inch balls. Roll in powdered sugar and place on a cookie sheet lined with parchment paper. Bake for 10-12 minutes. After baking, allow cookies to cool for 1-2 minutes before moving to a cooling rack to cool completely.


Mini spatula <3


Saturday, November 19

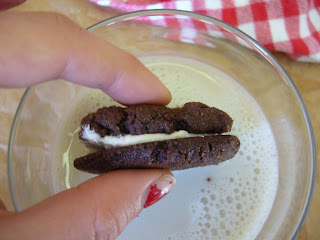
Peppermint Oreo Cookies

Can I say that? I don't have to call these "Chocolate Creme Sandwiches" or something? Pssht. This ain't Waaaalmarttt.

I think the chipped polish gives the picture a more peppermint=y look
Anyway, speaking of discount super stores, I got a little carried away in Target last night. I stopped in for shampoo and got totally sidetracked by Christmas decor (it's always something). I ended up with Christmas sticky notes, bells for my mini tree (it's the size of a coffee mug... and now it has giant bells on it.. it's SO cute), gift labels, tissue paper, candy canes, ribbon, etc. I'm getting really amped. And I know I'm a week early (I've never really loved Thanksgiving all that much; I know scandalous right?). But you know what, I'm an adult. And adults do what we want. Even if that's to get really excited about a holiday that's largely based upon belief in a fictional character who sneaks into your house and delivers presents in the night. And even if that means buying sticky notes shaped like bells. And gingerbread man squeaky toys for your dog, who has no concept of Christmas at all and makes the gingerbread man an amputee in .05 seconds. Whatever.


Vanilla Almond Milk = perfect dunking option
PS How cute is this!?


OMG Christmas Penguin, look out!
But after returning home and continuing to be really excited, I decided to mash up some candy canes and make these delicious peppermint oreo cookies. Because what better way to be excited about the holidays and steal a little of Thanksgiving's thunder than with peppermint candy cane confections? And who doesn't love a good oreo cookie? Exactly. So, here's a little bit of my week-too-early holiday cheer. If you can't stomach it for another week, save the recipe. It's definitely worthwhile! The whole thing is done in the bowl of a food processor. One stop shop. Minimal dishes, maximum milk dunking enjoyment. (If you haven't already heard me say this, I'll say it again: If you don't have one, GET A FOOD PROCESSOR.) The wafer part of these cookies is spot on to the original oreo; the frosting is a bit off, but I attribute that to the lard and preservatives that this homemade version leaves out. (You're better off without it.)

Soundtrack: Found this one on a friend's FB page and I sorta love it. It sounds a little generic in some parts, but most of it's really unique and fun.
TDRMC Annual Mix by Taikomochi Records

Peppermint Oreo Cookies
Adapted from Retro Desserts, Wayne Brachman, via Smitten Kitchen
Makes 15-20 sandwiches (I made mine larger, because I was in an "I want to eat 2 cookies, but tell myself I ate 1" kind of mood)


For the cookies:
1 1/4 c ap flour
1/2 c unsweeted Dutch process cocoa powder
1 tsp baking soda
1/4 tsp baking powder
1/4 tsp salt
1 c sugar
1/2 c plus 2 tbsp butter, room temp
1 egg


For the creme:
1/2 c butter, room temp
2 c powdered sugar
2 tsp vanilla extract
2 peppermint candy canes, smashed into bits


Preheat the oven to 375 degrees.


In the bowl of a food processor, add flour, cocoa powder, baking soda, baking powder, salt and sugar. Process on low until blended. Cut butter into tablespoons and add to bowl. Process on low until fully combined. Add egg and continue to process on low for 2-3 minutes, or until dough comes together and is fully moistened. You will need to scrape with a spatula at least once to ensure even distribution.


Spoon dough onto lined cookie sheets in rounded teaspoons. Flatten cookies a bit with the flat part of a spatula or palms. Bake for 9 minutes, rotating the pans halfway through.


While cookies are baking, rinse food processor bowl and blade and dry. Remove cookies from the oven and allow to cool for 2-3 minutes, then transfer to a cooking rack.


To make the creme, reattach food processor bowl to base and add butter. Process for 1 minute on low, scraping the sides occasionally, until whipped. Add powdered sugar and vanilla. Continue to process for another 3 minutes, or until creme is light and fluffy. With processor running on low, add candy cane bits. Run for another 30 seconds. 


Once cookies are fully cooled, use a spoon to drop about a tablespoon of creme on the underside of a cookie. Press the underside of another cookie to the creme to spread it out and create a sandwich. Repeat until all cookies are used. 


Dunk in milk and enjoy!


Whiiiirrrrrr